
cricket bat tutorial guide Making your own cricket bat at home feels exciting and creative. This Vinox Sports DIY Pro guide shows each step in simple English. You will learn how to shape, balance, and finish your own bat. This guide also helps you understand what makes a Cricket bat for beginners and how bat design changes for different players.
–> Explore premium quality and expertly crafted bats at Vinox Sportsto find the perfect match for your playing style and performance needs.
🏏 Why Make Your Own Cricket Bat?
A homemade bat gives full control over design and feel. You can create a Lightweight cricket bat for players who want quick shots and better control.
Benefits:
- Learn real bat-making skills
- Customize weight and balance
- Save money compared to market bats
- Understand how a Power hitting cricket bat works
Many players in T20 cricket bat India formats prefer custom bats for better performance.
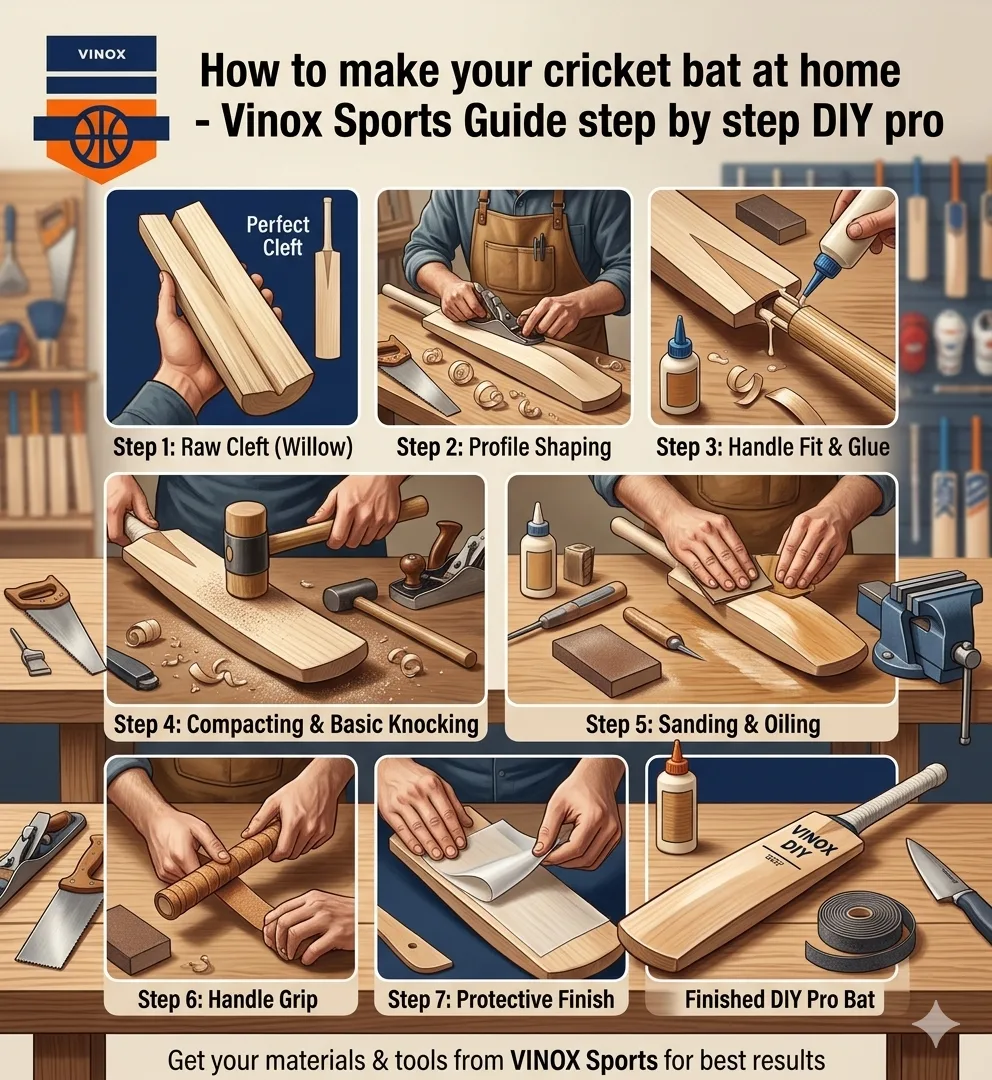
🪵 Step 1: Choose the Right Wood
Wood decides bat quality.
Best options:
- English willow
- Kashmir willow
- Soft hardwood
If you want something close to a Best English willow cricket bat under ₹10000, choose clean willow with straight grains.
Also, if you need a Cricket bat for tennis ball, you can use slightly harder wood.
Check before using:
- No cracks
- Dry surface
- Straight grains
Good wood improves performance for a Cricket bat for leather ball.
✏️ Step 2: Draw the Bat Shape
Mark your bat design clearly.
Tools:
- Pencil
- Scale
Draw:
- Blade
- Handle
- Edges
If you are new, design a simple shape. This step helps you build an Affordable cricket bat brands India style bat at home.
🔪 Step 3: Cut the Bat Shape
Cut the wood carefully.
Tools:
- Hand saw
- Electric cutter
Cut slowly to keep shape clean. This step builds the base of an Affordable English Willow Bats in India type bat.
🪓 Step 4: Shape the Blade
Now shape your bat.
Use:
- Chisel
- Plane
Focus on:
- Thick middle (sweet spot)
- Smooth edges
- Balanced weight
This step helps create a bat similar to a Cricket bat for professional players.
🧵 Step 5: Make and Attach the Handle
Steps:
- Cut slot in blade
- Insert handle
- Apply glue
- Bind tightly
This improves comfort for long matches and power shots.
🧴 Step 6: Sand and Smooth the Bat
Sanding gives a clean finish.
Use:
- Sandpaper
Smooth all surfaces well. A smooth bat performs better and looks professional.
🛢️ Step 7: Oil the Bat
Apply linseed oil to protect wood.
Steps:
- Apply light coat
- Let it dry
- Repeat 2–3 times
This step improves durability and strength.
🔨 Step 8: Knock-In the Bat
Knocking prepares your bat for real play.
How:
- Use wooden mallet
- Hit gently on blade
- Focus on edges
This step is important for a strong Power hitting cricket bat feel.
🏁 Step 9: Final Finishing
Now complete your bat.
Do this:
- Add grip
- Check balance
- Test with soft ball
After finishing, your bat can match a Best cricket bat under ₹5000 level for practice and local matches.
⚠️ Common Mistakes to Avoid
- Using wet wood
- Skipping sanding
- Over-oiling
- Not knocking properly
Avoid these mistakes for better results.
💡 Pro Tips from Vinox Sports
- Keep bat light for faster shots
- Maintain balance for control
- Store in dry place
- Practice regularly
These tips help improve performance and durability.
🏏 Final Words
Making a cricket bat at home takes time and effort. However, it gives great satisfaction. You learn how bats work and how to improve them.
This Vinox Sports DIY guide helps you build your first bat step by step. Your bat may not match factory quality, but it will still perform well for practice and fun games.
Start today and create your own perfect cricket bat!

 No products in the cart.